LDCad for VEX IQ
Modeling and Rendering Photorealistic VEX IQ Models
By Philip TaylorStep 1: Get LDCad for VEX IQ
LDCad is a phenomenal modeling tool for modeling LEGO sets developed by Roland Melkert, that has been customized to work for the VEX IQ building system by Philippe “Philo” Hurbain. Philo’s customized version is not up to date with the latest official LDCad, so while it works fine it is missing some features such as selecting parts by drawing a bounding box. If you are fine with this, you may install LDCad for VEX IQ as per the instructions on his website and continue on to the next step. However, if you would like to update LDCad for VEX IQ yourself, here are the steps for doing so:
First, visit the Philo’s website and download these items:
- From the LDCad for VEX IQ page, download the portable version by clicking the text “this archive” at the bottom of the page.
- From the Unofficial SnapCAD parts for VEX IQ page download the parts package by clicking the text “parts package” at the top of the page.
Next, visit Melkert’s website and download these items:
- From the Downloads page, download the portable version by clicking the text “archive” in the “Version: 1.6d” section (or whichever section is most recent).
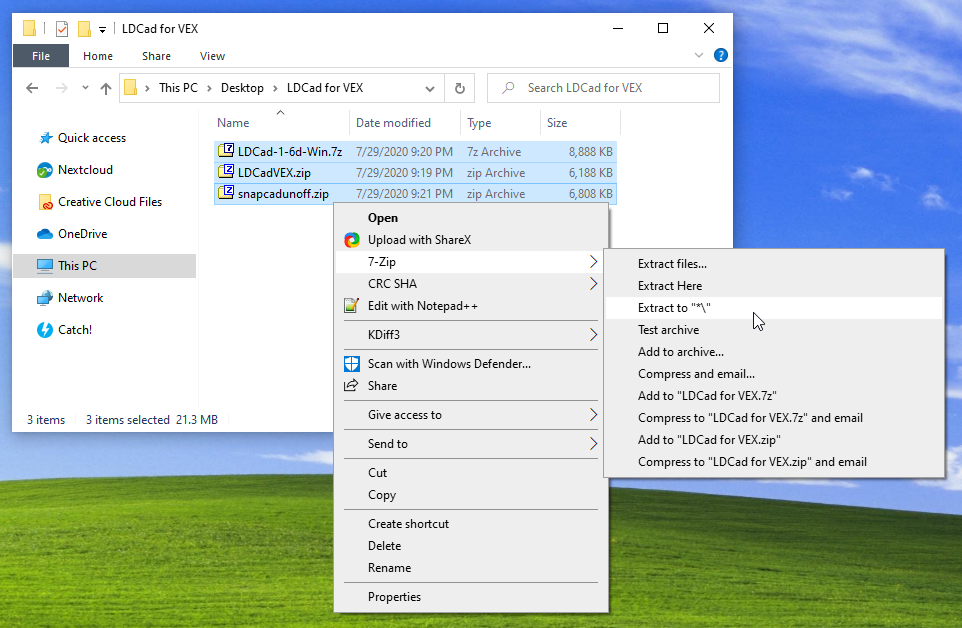
Once you have downloaded all the archives, place them together in a folder that is otherwise empty. Using an archive extraction tool such as 7-zip, extract each archive into a folder of its name.
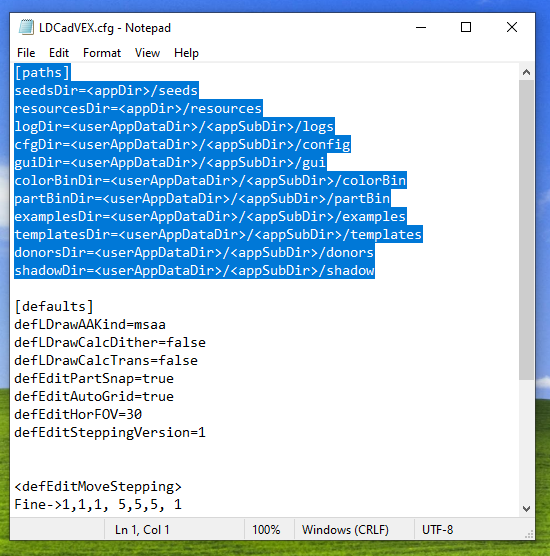
In the new LDCadVEX folder, delete the file named LDCadVEX.exe (it has the
icon of a green LEGO® brick) then open the file LDCadVEX.cfg using
notepad. Delete the text highlighted in blue below leaving the rest of the file
untouched. Save the file and close notepad.
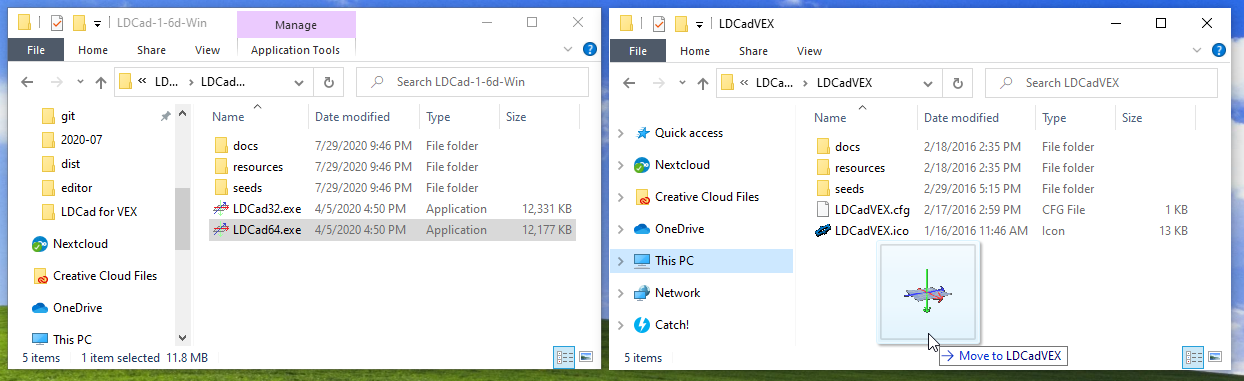
Open a new Explorer window and browse to the location you put all your archives
and newly extracted folders. Enter the folder named LDCad-1-6d-Win. If you are
using 64-bit windows, which has been the standard since 2008, drag the file
named LDCad64.exe over to the LDCadVEX folder window. If you’re using 32-bit
windows, do the same but with LDCad32.exe. If you are unsure whether you are
using 32- or 64-bit Windows, drag the 32-bit version. Once you have moved the
LDCad64.exe (or LDCad32.exe) file, rename it to LDCadVEX.exe.
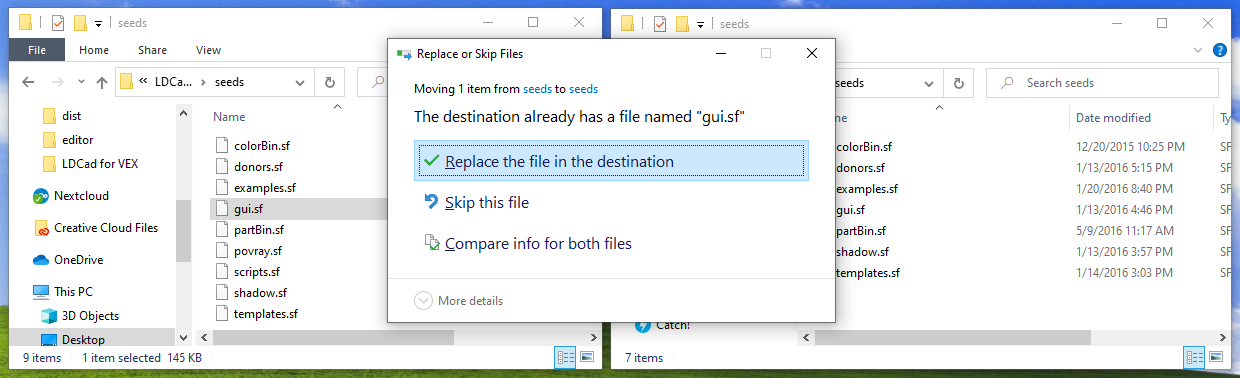
In both windows, enter the seeds directory. Drag the file named gui.sf from
the LDCad-1-6d-Win\seeds folder window to the LDCadVEX\seeds folder window.
When prompted, click to “Replace the file in the destination”.
Once you have done this, LDCad for VEX has been updated to the latest official
LDCad version. You may now delete the folder named LDCad-1-6d-Win.
Step 2: Run and Configure LDCad
When you first run LDCad (either by double clicking LDCadVEX.exe if you
followed the steps above, or from the start menu if you used the outdated
installer), it will prompt you to accept a license agreement. After doing so,
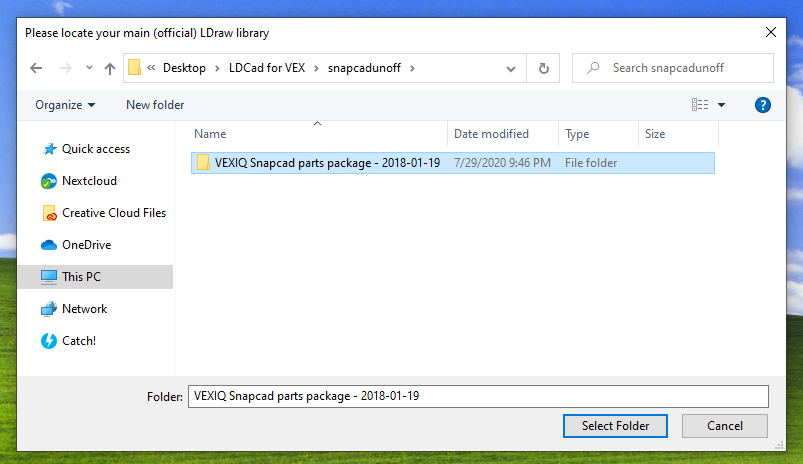
you will be prompted to select a folder. It is now that you will browse to
the extracted snapcadunoff folder and choose the VEXIQ Snapcad parts package
item.
Now that LDCad is open, either start a new model or open an example model. The
example Ike-Cables.mpd demonstrates the impressive cable and rubber band
modeling system.
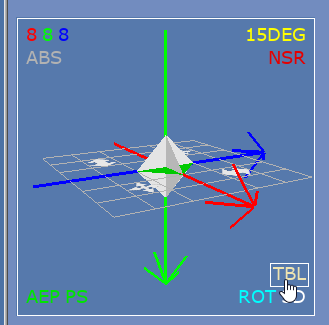
The most important LDCad tip I wish I had known when I started modeling with it
was how to change the camera control mode. At the bottom left of the work area
is a small grid with three vector arrows. Hover over this grid to gain access
to the work area’s settings. There is a button in this settings menu labeled
alternately TBL or SPN. Click it so it shows SPN, as this will make the
camera control behave more similarly to most other 3D applications.
Step 3: Using LDCad
With those bits of configuration out of the way, you can familiarize yourself with the controls:
Camera Movement: The camera can be rotated by clicking and dragging either the left or right mouse button. The camera can be panned by holding shift while doing the same clicking and dragging action. The camera can be zoomed by using the scroll wheel.
Part Selection: In the part bin on the left, you can search for parts by what they’re used for (click the pile of parts), what kit they’re included in (click the VEX IQ parts bins), or by name (click the magnifying glass). The section labeled with the icon of flexible parts contains templates to generate cables, rubber bands, chains/treads, etc. These are very useful, but can be difficult to use correctly. Some parts in the part bin are changed by the color selected in the color wheel at the top left, while others have a hard coded color value (e.g. to match the parts available in the kit).
Once you’ve found the parts section you’re most interested in, or if you have entered the magnifying glass search section, you can filter for the part you want by typing its name into the text box just above the part bin. By default this box will say
[no filter]. In the magnifying glass section, this will search all parts known to the application. Anywhere else it will filter from the parts in the current section (e.g. in the Super Kit section it will only search among parts in the Super Kit).The part preview angle can be adjusted by holding Control and scrolling while the cursor is over the part bin. Holding just Control will rotate the part horizontally. Holding both Control and Alt will rotate the part vertically. This is useful to get a better look at a part before bringing it into the work area.
When you have the part you want visible in the part bin, left click and drag it into the work area. Before releasing the mouse button you can use the arrow keys to adjust the rotation of the part. After releasing the mouse button the part will be added to the work area and will be selected.
Part Movement: The simplest part movement control is to click and drag the part to where you want it to be. This is great for simple models, but can be imprecise the more complex your model becomes (the part will often try to snap to the wrong places).
Protruding from the selected part is the “editing pin”, which I will refer to here as the editing obelisk to avoid confusion with VEX pins. Clicking different locations on the editing obelisk will put it into different modes, allowing you to move a part, rotate a part, or change its center of rotation. Once in a particular mode, the part can be moved by clicking and dragging along the blue transparent disc (called the umbrella).
It can sometimes be difficult to click the right place on the editing obelisk. Thankfully, the two most useful modes (move and rotate) can be accessed by pressing the shortcut keys
mandr. Additionally, if the umbrella is obscured, the part can be moved according to the selected mode by using the arrow keys.The editing obelisk will always snap to the axis closest to perpendicular to the angle you’re looking at the part from. If you want to move or rotate the part along the axis you’re looking at the part from you will have to rotate your view.
Moving Multiple Parts: It will often be desirable to select and move multiple parts at a time. This can be accomplished by holding the Control key while clicking the additional parts you would like to select. You can also select multiple parts by holding the Control key then drawing a bounding box by right clicking and dragging. parts inside the box will be selected.
These are the main methods of editing your model. Other methods can be learned from the official LDCad documentation at www.melkert.net/LDCad/docs.